Basic Authentication with REST
Published: Not Available
Last Update: Not Available
Overview
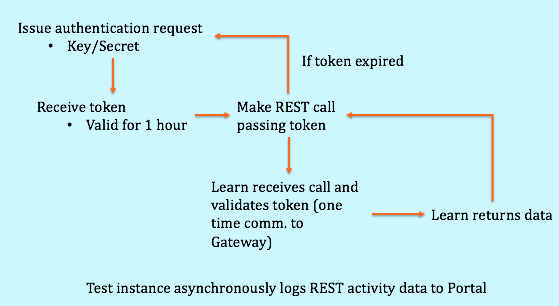
Authentication for REST Integrations follows the OAuth 2.0 RFC Standard. Each developer has a unique key and secret associated with each application they create. The developer makes an HTTP Post directly to the REST-enabled Learn server requesting an OAuth access token. The Learn instance forwards the request to Anthology's Developer Portal, adding its own siteId to the request so that the portal can determine whether the application is registered with the server. The Portal returns an authorization token that grants the application access to the Learn REST API for one hour. The developer uses this token in subsequent REST calls until the token expires. This workflow is illustrated in the following diagram:
WARNING: Never share or expose an application's key/secret pair. These are used for requesting OAuth tokens, which enable the holder to issue REST requests. Exposing an application key/secret pair or token is a serious security risk. If you think you have exposed a key/secret pair you may request a new pair for the application using the Developer Portal My Applications management page.
REST calls are subject to quotas and limits. For more information, see Developer Groups, Site Quotas, and Rate Limit.
Before You Start
- You must have a developer account at developer.anthology.com.
- Your application must be registered at developer.anthology.com.
- The application ID you receive when registering at developer.anthology.com must then be used to install your integgration on your Learn instance. Installing your application on a Learn instance provides the application key:secret pair access to the Learn instance.
To Get a Token Using Basic OAuth 2.0
Use the following high-level steps to fetch a token from your Learn instance. Remember that your Learn instance must be registered at developer.anthology.com and that your application must be registered on your Learn instance. Registering your application with your Learn instance provides you with an application key and secret.
Use cURL or an appropriate HTTP library to make a POST REST call to the
/learn/api/public/v1/oauth2/token endpoint.
Headers must include:
- Content-Type set to application/x-www-form-urlencoded
- Authorization set to Basic followed by a space and with your base64-encoded credentials appended. Credentials must be formatted as application-key:secret before encoding.
For example, if your application key were:
- `12345678-1234-5678-1234-1234567890ab
and your secret were
abcdefghijklmnopqrstuvwxyzabcdef
you would encode the string:
12345678-1234-5678-1234-1234567890ab:abcdefghijklmnopqrstuvwxyzabcdef
yielding the encoded value
MTIzNDU2NzgtMTIzNC01Njc4LTEyMzQtMTIzNDU2Nzg5MGFiOmFiY2Rl.htmloaWprbG1ub3BxcnN0dXZ3eHl6YWJjZGVm
Prepending Basic to that value gives
Basic MTIzNDU2NzgtMTIzNC01Njc4LTEyMzQtMTIzNDU2Nzg5MGFiOmFiY2Rl.htmloaWprbG1ub3Bx cnN0dXZ3eHl6YWJjZGVm
which would be your Authorization header value. Some REST libraries and clients like cURL handle this encoding for you.
The body must include:
- grant_type=client_credentials.
If everything is working correctly, the server will return an HTTP 200 response and a data body. The data body includes a field access_token. Your access token for further REST calls is the value of this field.
To Make a REST Call with the Basic OAuth 2.0 Token
Use the following high-level steps to use a Learn REST API token to authorize other REST calls.
Use cURL or an appropriate HTTP library to make a REST call to the appropriate endpoint. For a list of endpoints and the methods supported for each, see the Learn REST reference docs at https://developer.anthology.com/portal/displayApi/Learn.
Headers must include:
- Content-Type and Accept should be set as specified by the reference docs for the call you want.
- Authorization set to Bearer followed by a space and your access token. For example,
Bearer abcdefghijklmnopqrstuvwxyzabcdef - The body and URL parameters must be set as specified by the reference docs for the call you want.
If everything is working correctly, the server will return an HTTP 200 response and a response body as specified by the reference docs for the call you made.
Example: Using cURL to Get a Token and Make a REST Call
The easist way to test is using cURL. We will assume you have already registered through the [Developer Portal](/rest-apis/learn/Getting Started/registry) and retrieved your application ID, key, and secret, as well as [added your application ID](/rest-apis/learn/Getting Started/registry) to the Learn server you wish to integrate with:
- From the command line, use cURL to send a token request to Learn, signed with their application key and secret:
    key=<your key>
    secret=<your secret>
    curl -i -X POST -u "$key:$secret" https://<your server>/learn/api/public/v1/oauth2/token
    -d "grant_type=client_credentials"
The cURL statement calls and HTTP POST request. This POST request contains an Authorization header that states this is Basic authentication. The cURL command uses the -u switch to create and send a Base64-encoded version of key:secret. cURL sets content-type to application/x-www-form-urlencoded for you.
- The developer portal returns a standard OAuth 2.0 response, which is passed back to the developer. For example:
    HTTP/1.1 200 OK
    Content-Type: application/json;charset=UTF-8
    Cache-Control: no-store
    Pragma: no-cache
    {
         "access_token": "abcdefghijklmnopqrstuvwxyzabcdef",
         "token_type": "bearer",
         "expires_in": 3600
    }
- Use the returned access token to make further REST calls. For example:
    curl -X GET -H "authorization: Bearer abcdefghijklmnopqrstuvwxyz"
    https://yourserver/learn/api/public/v1/users?query=userName
Implementation notes:
- Tokens expire after 1 hour, as per the OAuth RFC examples.
- Tokens are associated with a specific Learn site.
- Any application may have only one token per Learn site. Asking for a token returns the existing one with an updated expiry time if it has not expired yet.
- Check the Learn REST API Documentation for error codes.
Contributors on this article: