Start here
Published: May 09, 2023
Last Update: March 19, 2024
On this page learn about the Blackboard Developer Portal. Learn how to register for and navigate in the Portal. Selecting a navigation link on the side panel of this page takes you to that section.
What is the Blackboard Developer Portal?
The Blackboard Developer Portal is for anyone interested in developing integrations with the Blackboard product portfolio. Find information about our REST APIs, our developer-facing documentation, and Portal-related announcements.
Create an account to register an application. Registration is a required step for testing and releasing your integration.
Contact us at developers@blackboard.com for any issues related to integrations.
Navigating the blackboard Developer Portal
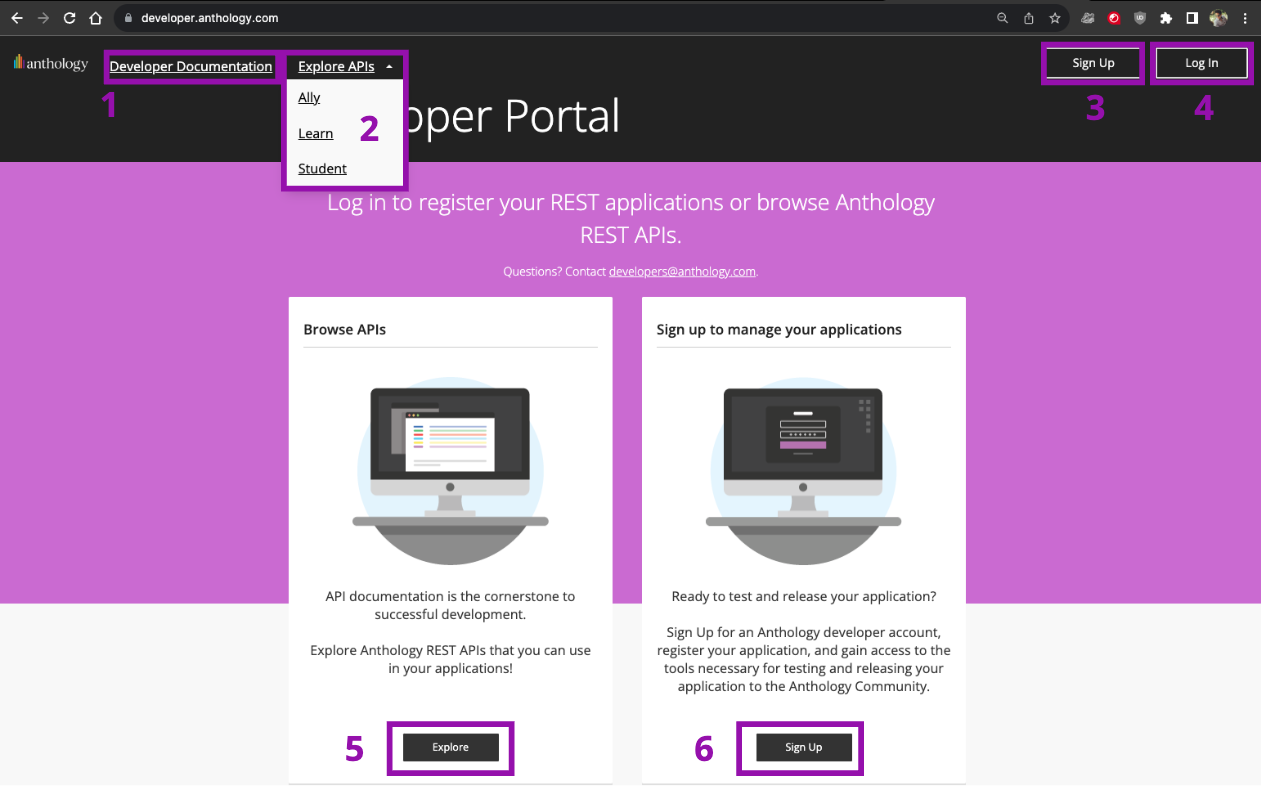
When you enter our developer portal, you will find several links starting from the top left. Select an item in this list for more details and instructions.
- Developer Documentation. Directs you to docs.anthology.com.
- Explore APIs. Directs you to our Learn, Ally, or student Swagger for up-to-date lists of APIs.
- Sign up. Create a brand-new Developer Portal account.
- Log in. Log in to your existing Developer Portal account.
- Explore (Browser APIs). Another way to navigate to our Learn, Ally, or student Swagger.
- Sign up to manage your applications. Another way to create a brand-new Developer Portal account.
Developer Documentation
Blackboard’s Developer Documentation (which includes this page) helps you explore Blackboard’s product resources. It includes tutorials, sample code, articles, and API references. For an overview, visit https://docs.anthology.com/docs/site-intro.
Explore APIs
Explore Public APIs for:
Each link directs you to a Swagger that displays all available APIs and their endpoints. Swagger is a suite of open-source tools for API developers from SmartBear Software. To learn more about how Swaggers work, visit Swagger’s documentation.
Sign up for a new account
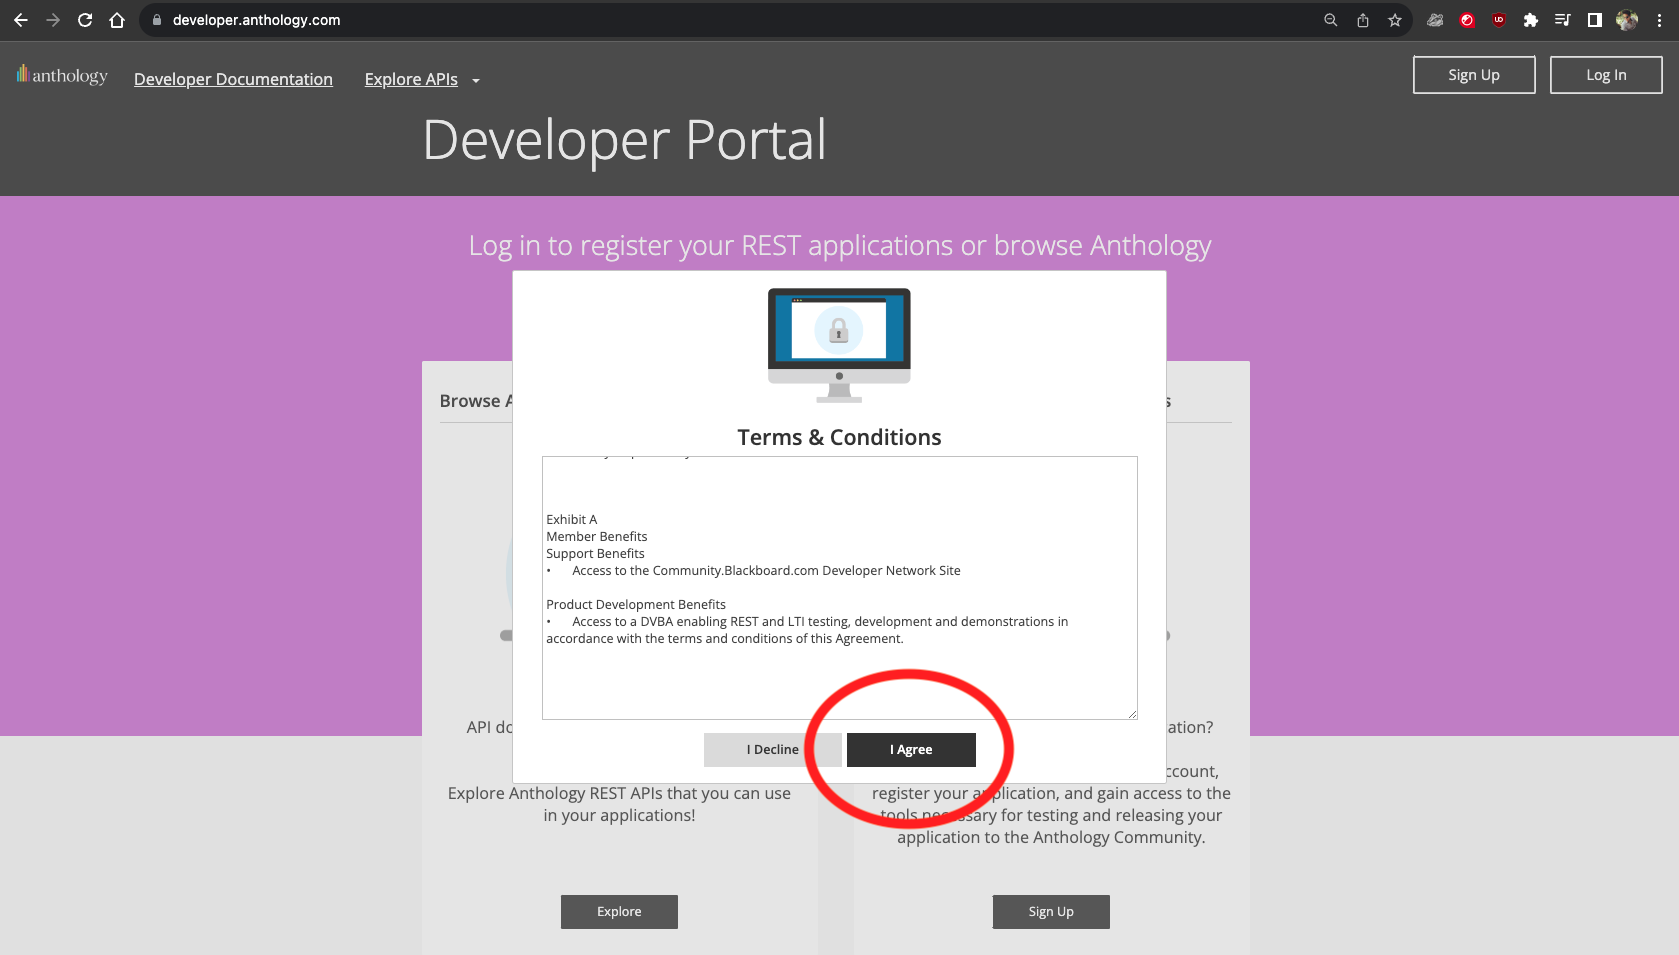
If you do not already have a Developer Portal Account, select Sign up.
A modal window is displayed that contains our Terms and Conditions. Please note that sometimes tracking blockers or ad blockers will disable this window. Turn off these blockers before signing up for a Developer Portal account.
Once you review the Terms & Conditions, select I Agree. Selecting I Decline will close out the window, and you will not move forward with account set up.
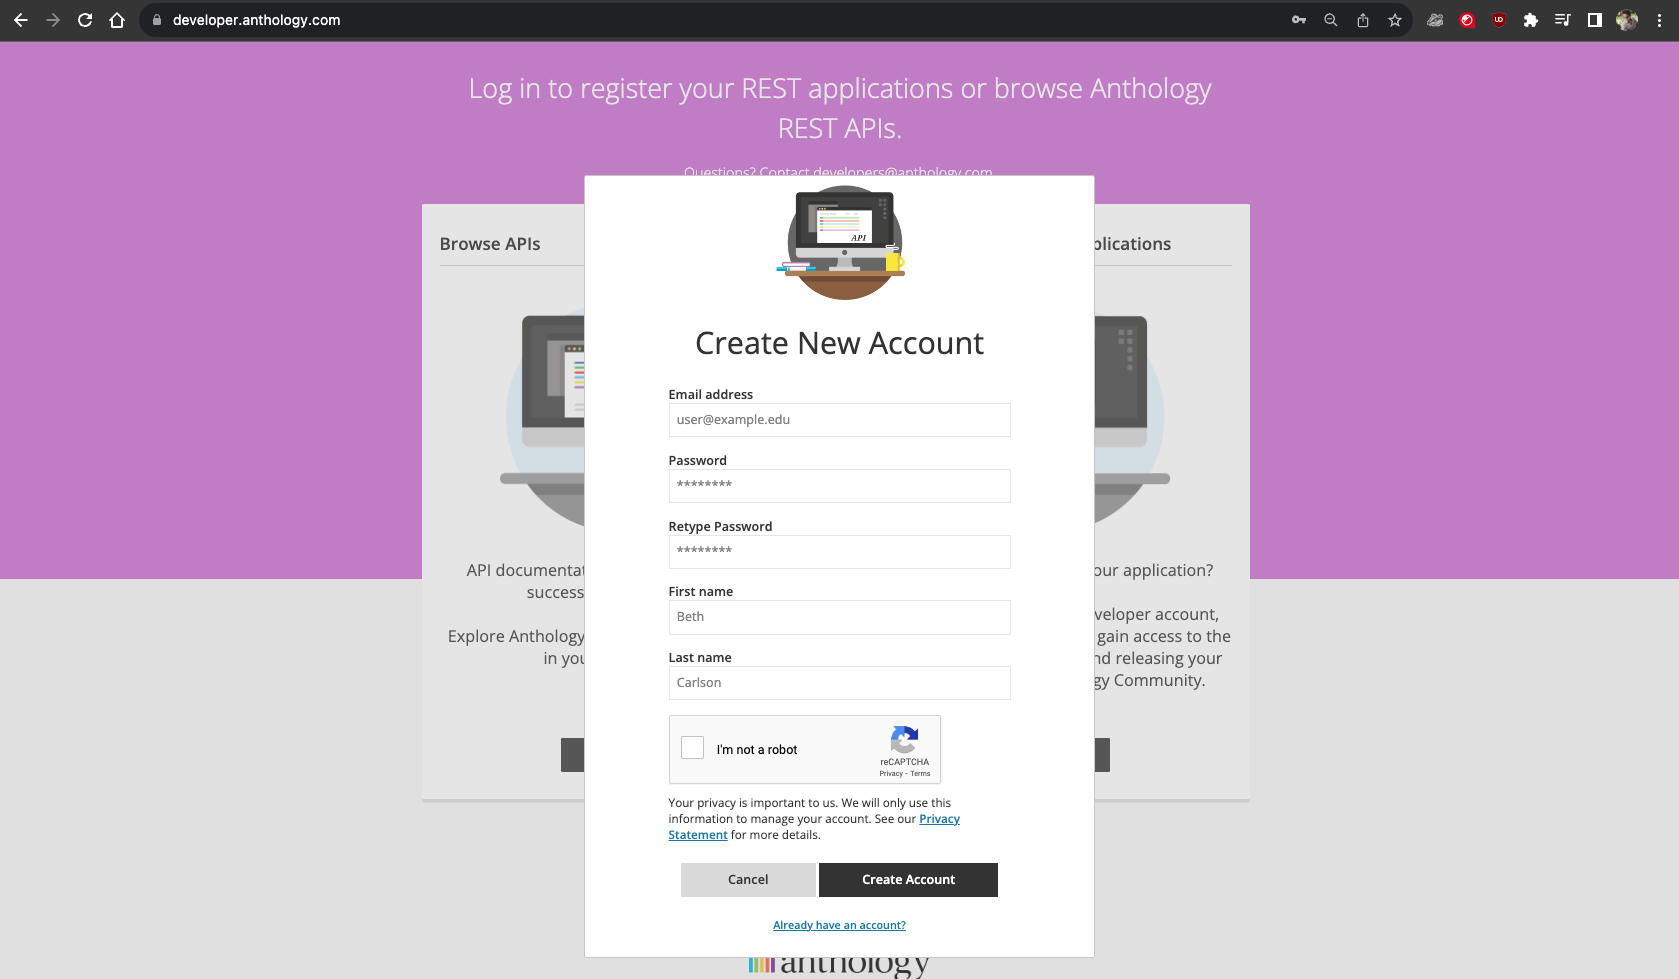
when you select I Agree, a form appears for user data input. Add the following data:
- Email address
- Password
- First name/Company Name
- Last name/Company Name
For your password, use the following rules:
- Use between 12-32 characters
- Use at least 1 uppercase letter [A, B, C, ...Z]
- Use at least 1 lowercase letter [a, b, c, ...z]
- Use at least 1 number [0, 1, 2, ...9]
- Use 1 special character (!, $, #, %...)
Check your password strength
- Password is between 12 and 32 characters
- Contains at least 1 uppercase letter
- Contains at least 1 lowercase letter
- Contains at least 1 number
- Contains at least 1 special character
What you enter into the First Name and Last name fields is what is displayed on Blackboard LMS to identify your integration. Entering a company name in the name fields can be done in this way:
- First name: blackboard
- Last name: Inc.
Confirm your identity in the CAPTCHA box. Then select Create Account.
If you are encountering issues when you select Create Account, make sure you have disabled tracking and ad blockers on your device.
If this is a company account, We suggest you use an email everyone on your team has access to.
Once you have successfully created your account, you will receive an email that gives information about our Documentation, Community, Partnerships, GitHub, and about our Amazon Machine Images AMIs.
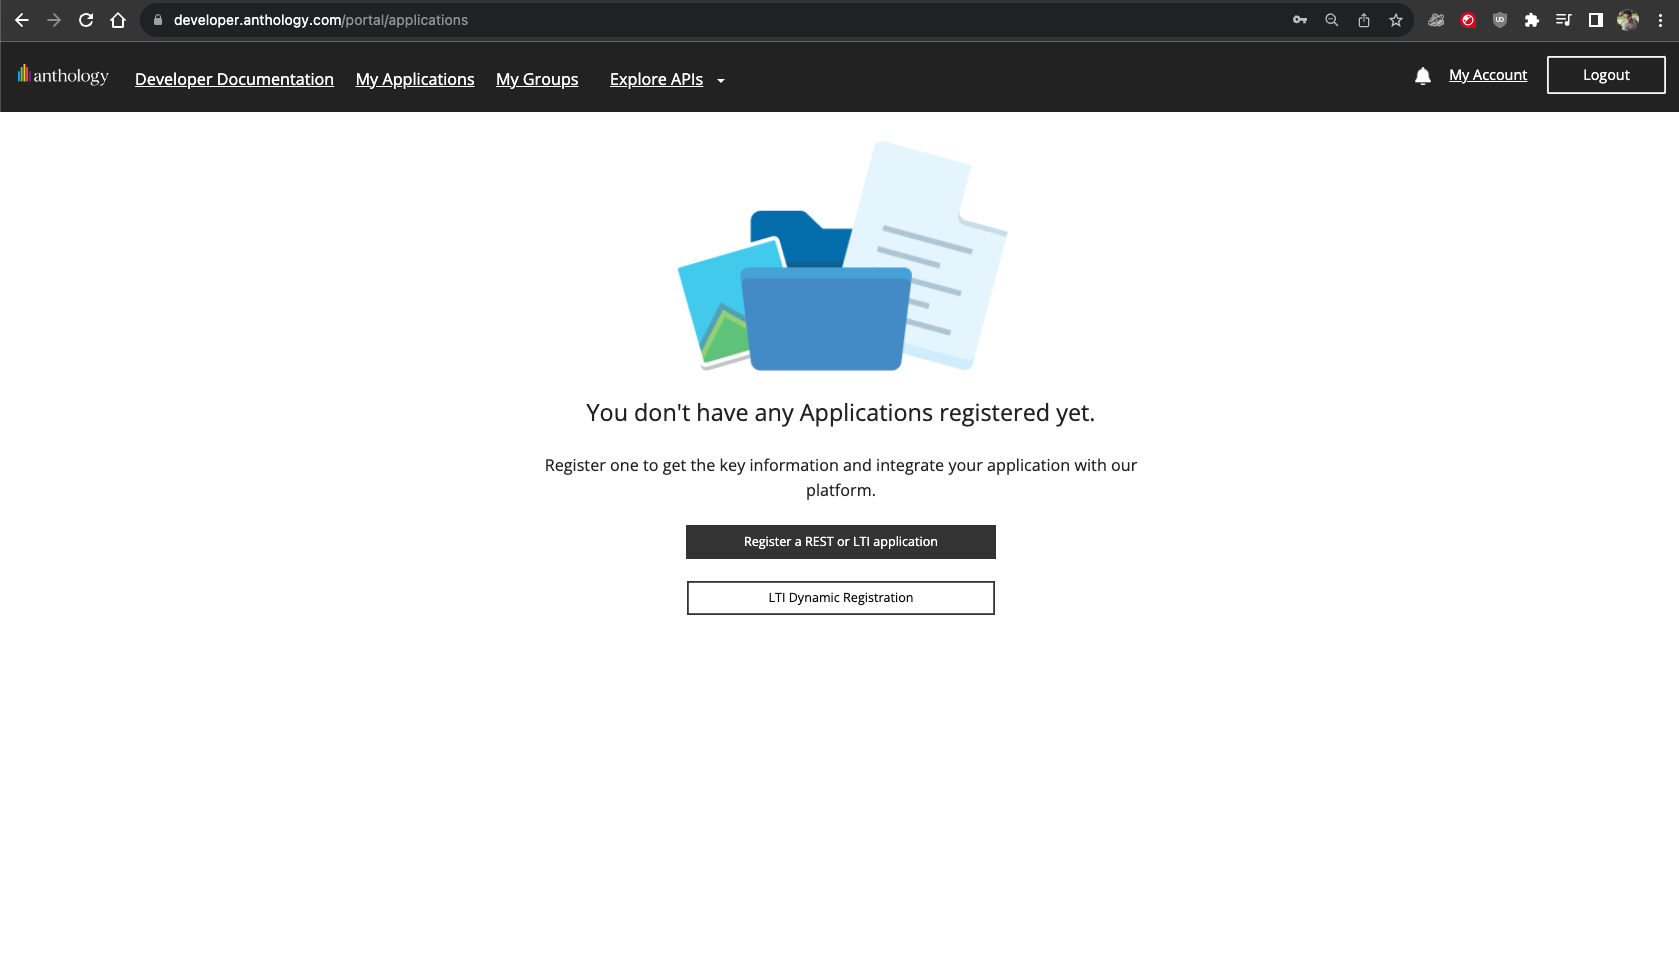
Once you have created your account, you will be presented with a page that looks like this:
Log in on your account
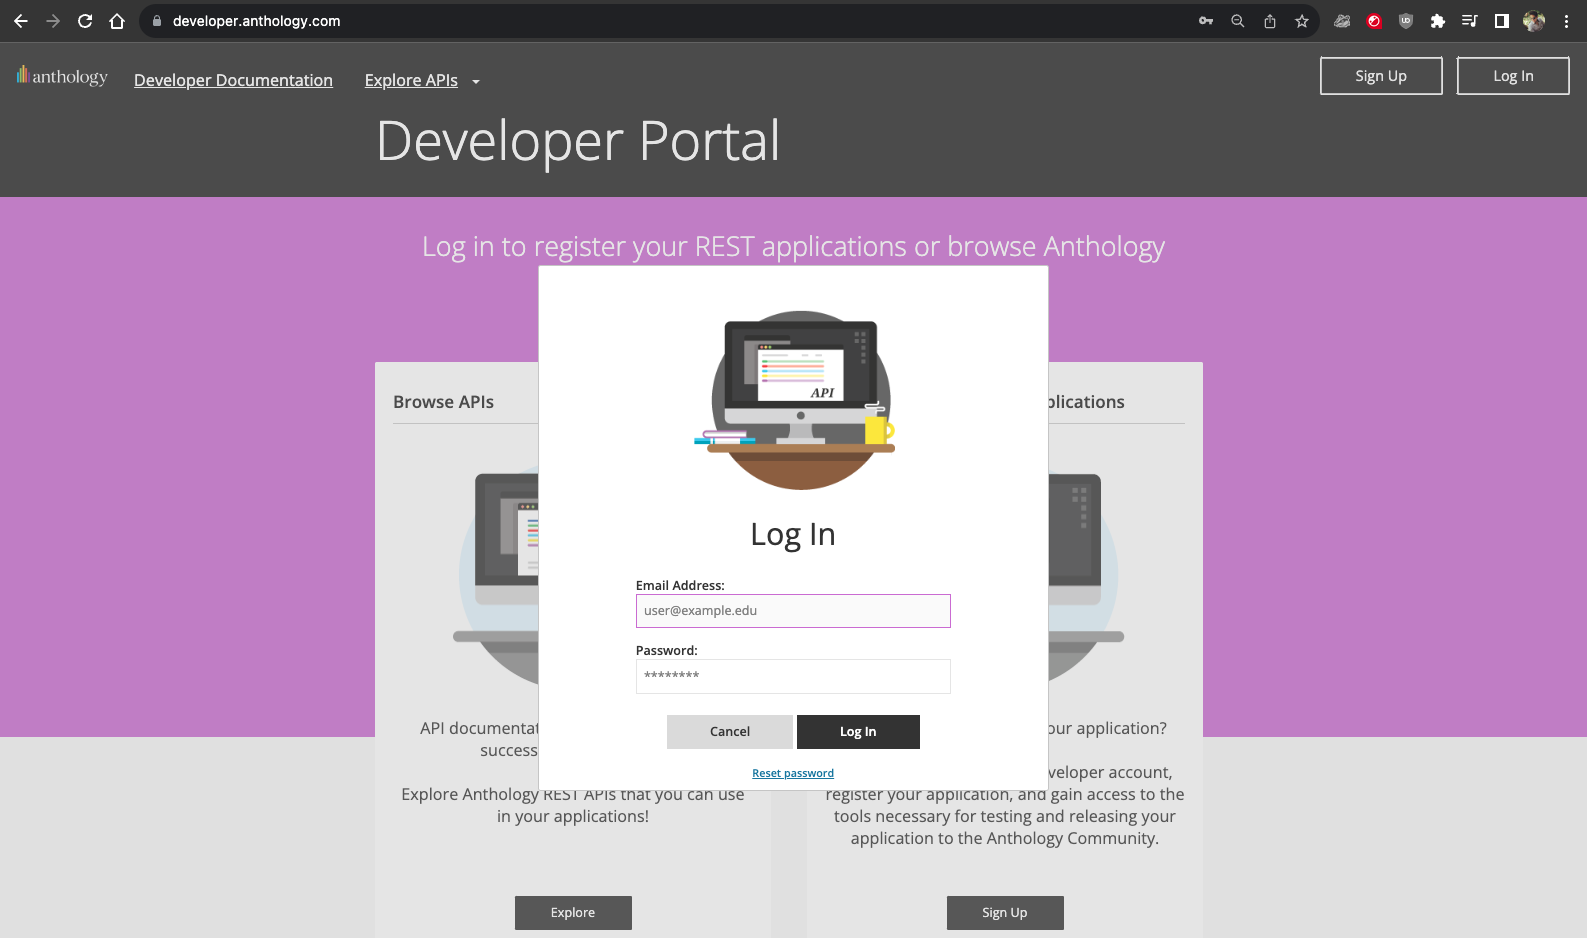
If you have an existing account, select Log In. A modal window is displayed to enter your email and password. If you have forgotten your password, select Reset password. Enter your email address, and you will receive an email with a link to reset it.
Please note that you will be automatically signed out of your account after 60 minutes of inactivity. If this happens, simply log in again.
Managing your Developer Portal account
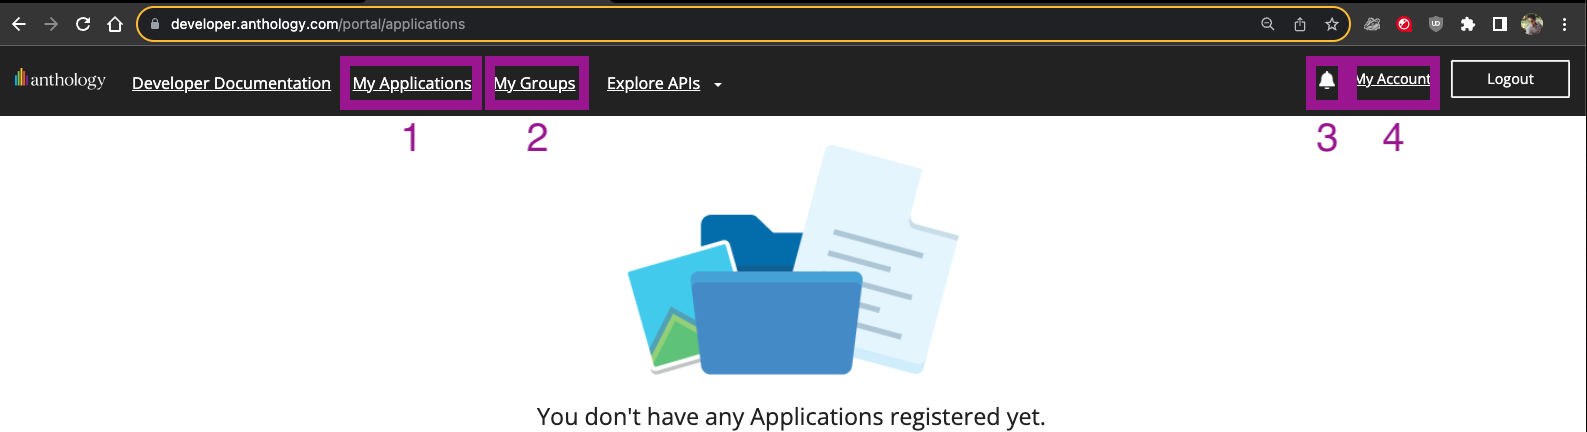
When your account is created and you have logged in, you will notice that the top menu contains several new items.
-
My Applications. Manage your registered applications here.
-
My Groups. Manage your groups here.
-
Bell Icon (🔔). View Notifications in the Developer Portal. Select 🔔 to see your notifications.
-
My Account. Select My Account to review or edit your information. You are not able to edit your email (Blackboard also cannot change this email). Your password can be reset by selecting Change password.
Browse APIs
When you click the Browse APIs you will be redirected to our Swagger for APIs: https://developer.blackboard.com/portal/displayApi
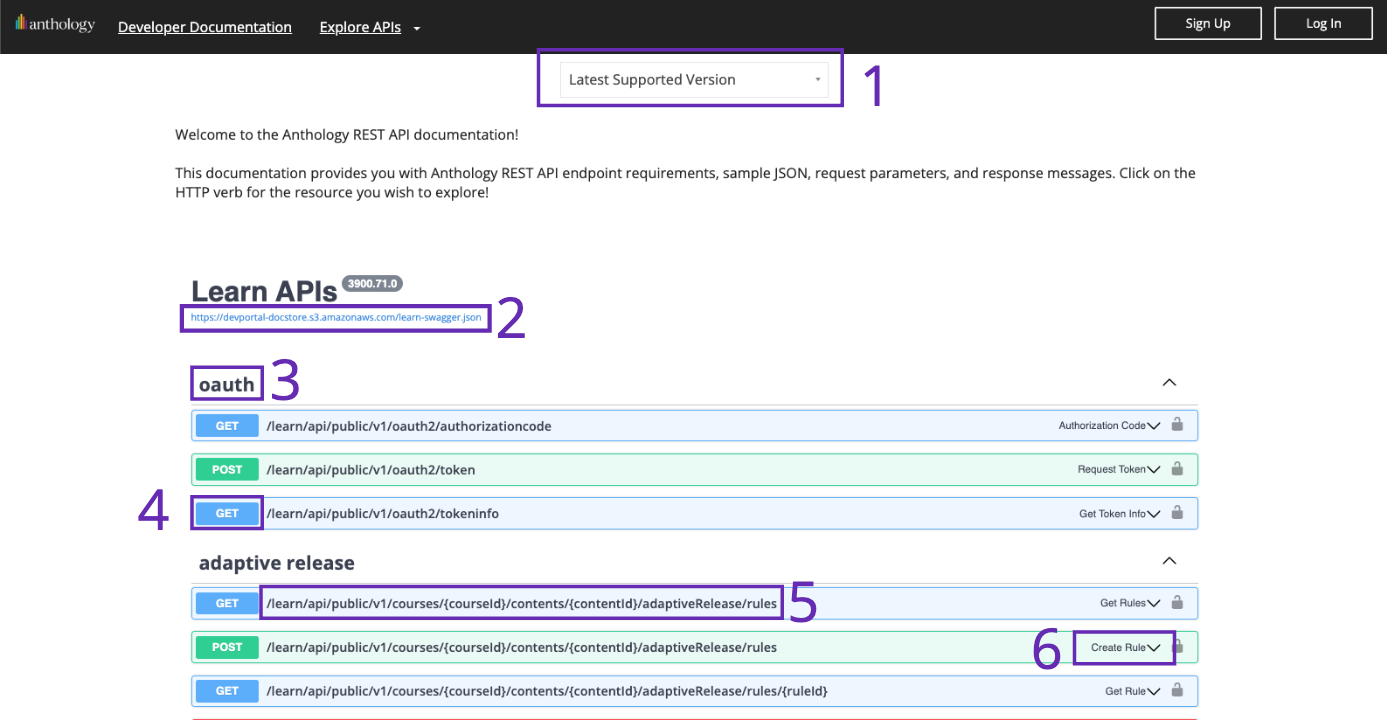
Overall Swagger API structure
This applies to our Learn, Ally and Student APIs that user Swagger for documentation.
- Version Selector. This defaults to the the latest supported version. The dropdown menu also contains older versions and newer, not-yet-supported versions.
- Link to JSON version. This is a JSON version of the Swagger page. The JSON version can be used to import all endpoints in a program such as Postman.
- Topic Title. Group of APIs related to that specific topic. You will find APIs divided by group with different methods.
- API method. Learn more about API methods
- API endpoint. Read about endpoint structure further down the page.
- Endpoint name. This is also known as Summary.
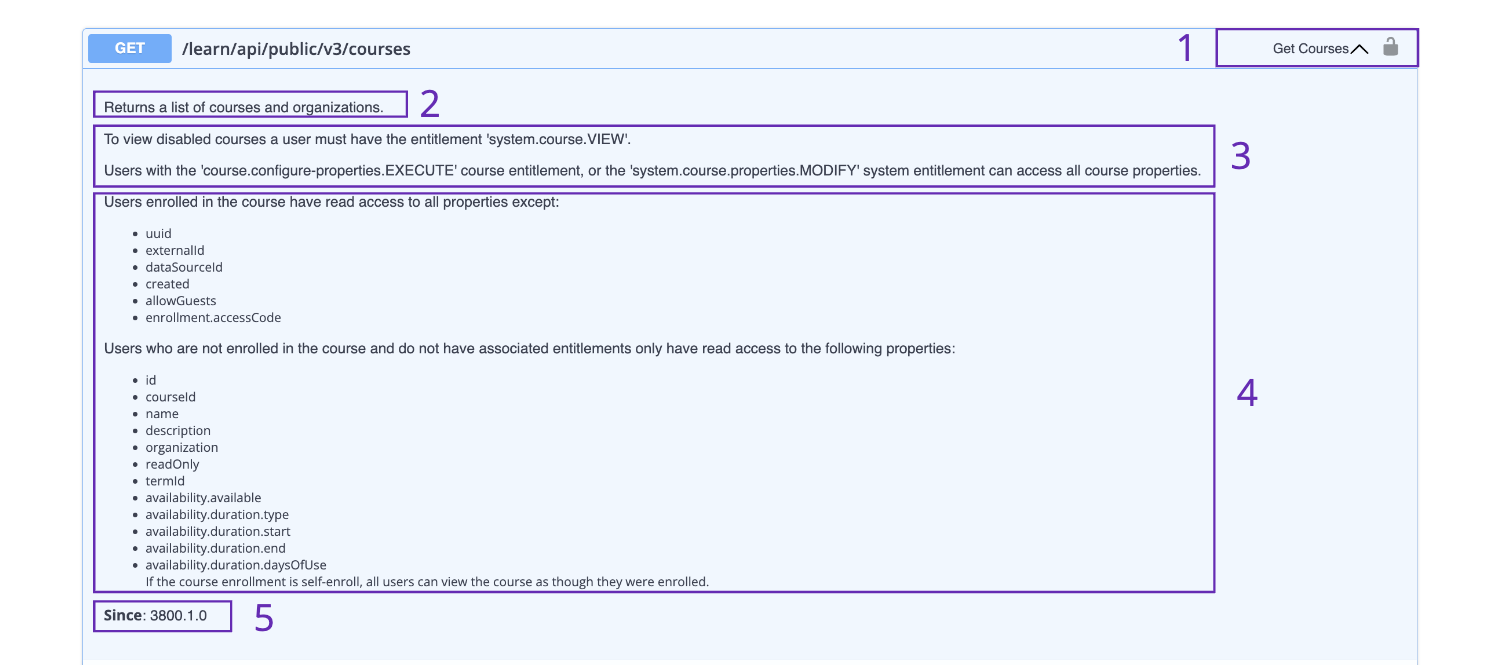
Endpoint structure
- Select the arrow to expand details about the API endpoint.
- The field below the endpoint listing gives a short description of what each endpoint returns.
- The field below the short descriptions lists entitlements that the endpoint requires. For more information, visit Mapping entitlements to enrollments.
- The field in the middle of the page lists limitations on the endpoint.
- The bottom lists the version of Learn when this endpoint became available.
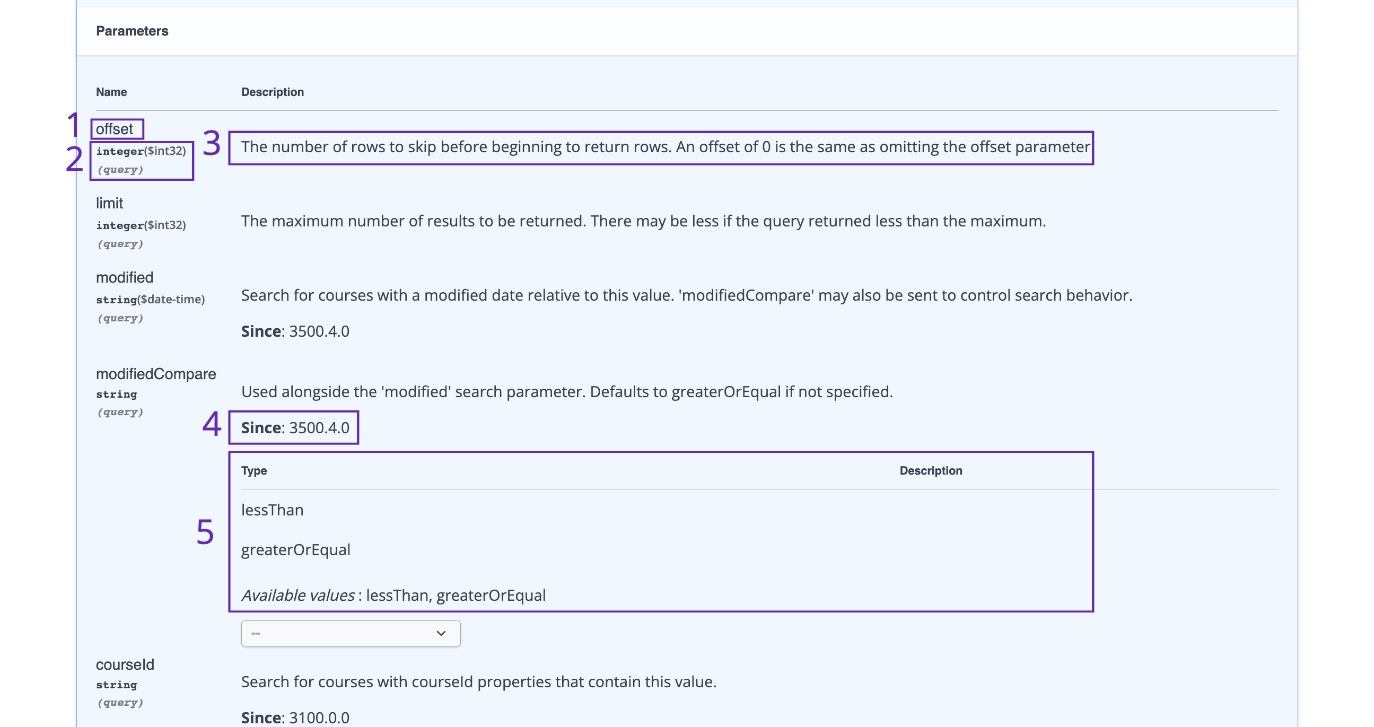
Endpoint parameter structure
-
Beneath the Name is the name of the query parameter. The query parameter must be used in the same way it is written here.
-
Beneath the query parameter describes three things:
- Type of value
- Character limit
- Type of parameter (either query parameter or path parameter).
-
Beneath Description is a description of the parameter.
-
The label next to Since lists the version of Blackboard LMS when the parameter was made available.
-
Beneath the version indicator is a field that lists Available values when the parameter allows specific values.
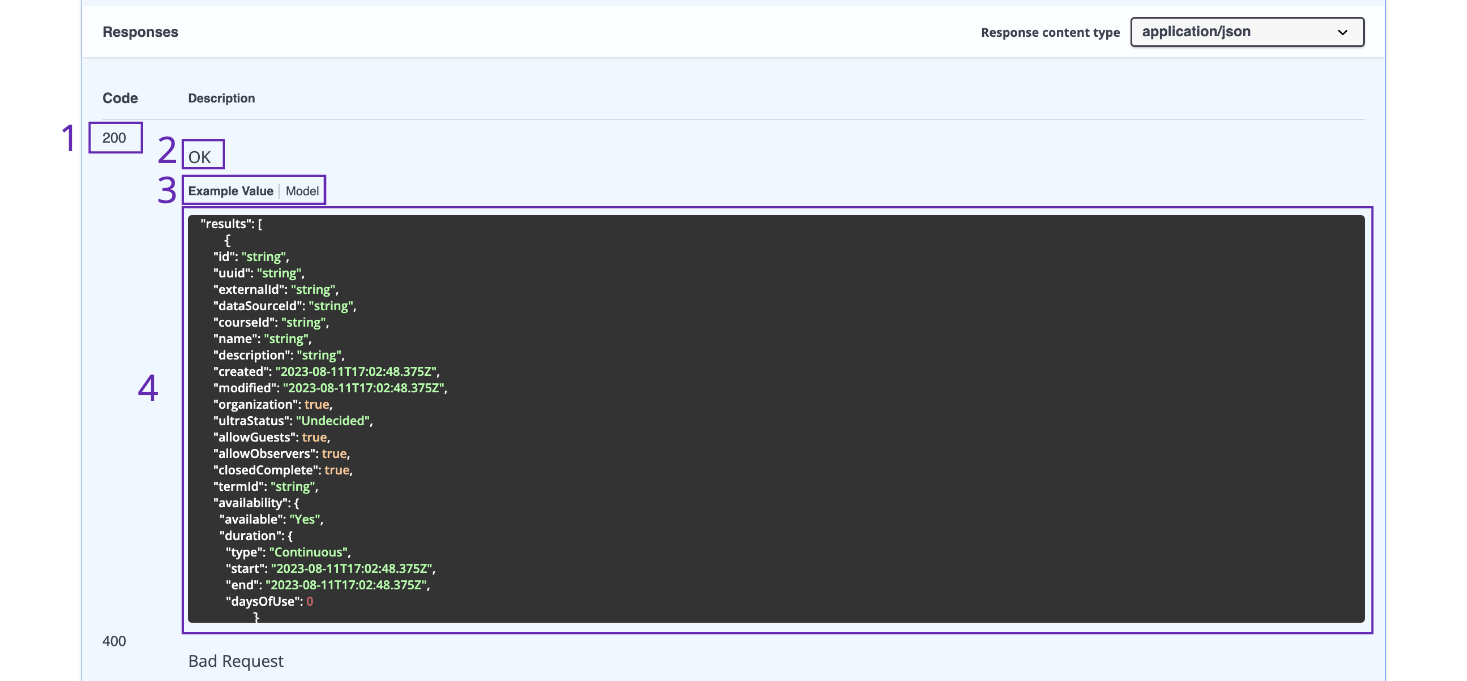
Endpoint response structure
- Beneath Code lists the HTTP response code.
- Beneath Description lists the message result of the HTTP code.
- You can toggle between Example Value and Model. Selecting Example Value displays an example of the JSON object (shown as item 4 in the screenshot). Selecting Model displays a data dictionary of the response.
- Example of the result as application/json
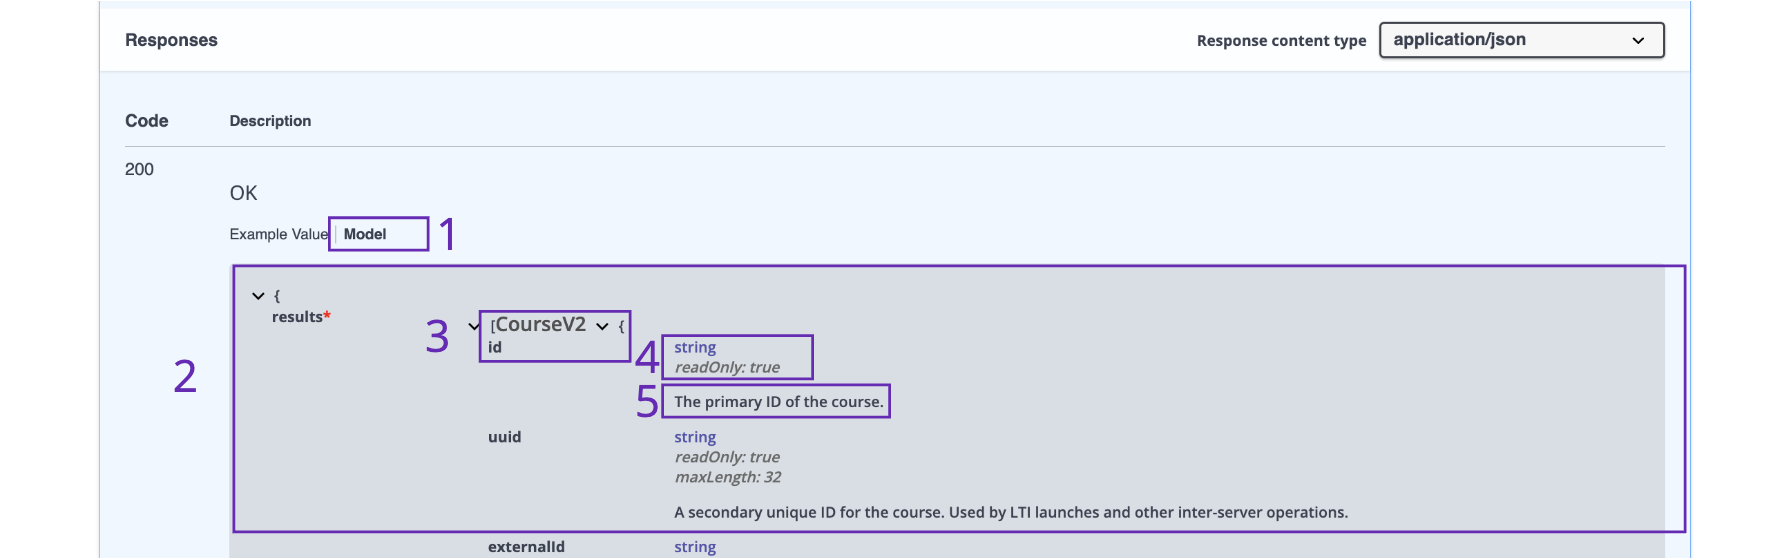
Endpoint response model structure
- When you select Model you are shown a data dictionary.
- Data dictionary of the result, which is available for all http codes. The data dictionary contains: Attribute value, value type, and description of the value of the attribute.
- Attribute value
- Type of value it returns and boolean of readOnly.
- Description of the value of the attribute.