First Steps with Learn REST API
Published: Not Available
Last Update: Not Available
Anthology offers a suite of education technology tools, both software and hardware. REST stands for Representational State Transfer. It is a lightweight, flexible web service architecture that allows HTTP commands to be sent to Web Applications without unnecessary overhead. We provide specific examples and tutorials about using Anthology REST APIs, particularly when a workflow is more complicated. For more general questions about REST and using REST APIs, see any of the numerous tutorials available online. Most commonly used resources include:
- Anthology's developer portal
- Anthology's Github repos
Before You Get Started
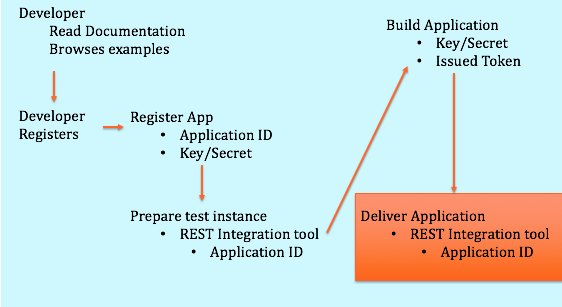
Anthology offers lots of tools to help you develop an application, plugin, or other integration for use with Anthology products like Learn and Student. The most important ones are your accounts with these sites:
- Anthology Developer Portal is where you register applications so they can work with Anthology products. It's also where you get your own key and secret that you need to authenticate your application with Anthology products.
- Anthology Developer Community is where you learn to develop with Anthology products, get the latest news, and discuss with other Anthology integrators.
Note that the Developer Portal and Developer Community require separate accounts.
Register as a Anthology Developer
LTI and REST integrations begin at the Developer Portal. This is where you register LTI and REST Applications and get the ID, key, and secrets for client deployment. In the portal, you can see which client systems are using the integrations. Signing up is free, and you can develop your integration at no cost. There may be cost involved in deploying your integration, but before that happens, you'll have to speak with us. To discuss deploying your application, please contact us at developers@anthology.com. Before you can authenticate your project with Anthology applications, you need to be a registered Anthology developer. To register as a Anthology developer:
- Go to https://developer.anthology.com/ and select Sign Up. Read and agree to the terms and conditions.
- Provide your email address, a password, your first name and last, and select the checkbox to prove you are human.
- Select Create Account and you're on your way.
For more information about the Developer Portal please see [this document](/rest-apis/learn/Getting Started/registry)
Note: If you are an Anthology client, an Anthology Partner / Vendor / Developer of a REST Application should NEVER tell you to go to the developer portal and create an App ID with the associated key/secret to install their application. They should never tell you to apply for a Rate/Site increase for their application. Anthology DOES NOT support that model. Every REST Application developer should give you an App ID to install their REST App and tell you how to configure a system role for its use. Period. The REST Application developer needs to request the increases they need to run their application themselves. If they ask you to go to developer.anthology.com and get an App ID/Key/Secret, please tell them that is wrong. They should have exactly one App ID for their production REST application that they are asking you to install.
Contractors are an exception to this policy as they are producing an integration on your, the Anthology client, behalf. Questions regarding the policy and whether you are impacted may be asked here, or posted to developers@anthology.com
Join the Community
The Anthology developer community is the best place to find more information about integrating your project with Anthology products. You will benefit from the community most by joining in.To register in the Anthology developer community:
- Go to Anthology Developer Community and select Register.
- If your organization is a Blackboard client or partner organization and you have a Behind the Blackboard login, select Behind the Blackboard Login. Otherwise, select Community Site Login.
- Enter your email address to receive a link via email.
- In your email's inbox, find the email sent by Blackboard. You might have to check your spam or junk folder. The email's subject is something like Blackboard Community: Email Validation. Select the link in your email. You will be taken to a registration page.
- In the registration page, complete all the required fields and select Create Account.
What Blackboard Application Do I Need?
Your Anthology-compatible application can work with one or more of Anthology's tools. How you build an integration with Anthology software and hardware depends on which tools you want to integrate with. The tools you'll want to use depend on what you want to do.
I want to programmatically... You'll need to...
Add files, text, and the like to Learn
- Authenticate with Learn via REST API
- Check out our Learn REST API reference
Get Development Instances of Anthology Applications
Anthology makes available instances of Anthology applications that you can use to build projects that integrate with Anthology applications. Among others, we offer these popular developer instances.
- AWS instance of Learn
While Blackboard does not charge for entry-level use, AWS may charge various fees for their services.
Developing with Learn
Go to the developer portal and [register as a Developer](/rest-apis/learn/Getting Started/registry) if you haven't already, and then register your application to get a key and secret. Use your key and secret to authenticate with Learn.
Look at the Learn REST Reference
Check out the Learn REST API Reference. In particular,look at the range of endpoints available. Check the Since version for endpoint that interest you. This version number indicates the version since which the endpoint has been available. This way, you can make sure that your Learn server is is able to use it.
Authentication/Authorization
Authentication for REST Integrations follows the OAuth 2.0 RFC Standard. Essentially, every developer has a unique key and secret associated with each application they create. They make an HTTP Post to the API requesting client_credentials, which returns an authorization token that grants the application access to the Learn REST API for one hour. This token is then passed in subsequent REST calls until such time that the token expires. This can be done either with Basic Authentication or, as of Learn 3200.7 in SaaS or Q4 2017 for self- and managed-hosted clients, using Three-Legged OAuth.
Calling Services
Once your application acquires an access token, it only needs to pass that token as a Bearer token in the Authorization header of your API calls. Review the authentication documentation in the above section for an overview, or find more specific details on the available API endpoints and APIs on the Developer Portal's Swagger API document.In its current implementation, Learn REST APIs does not support Cross-Origin Resource Sharing (CORS). To learn about this and see an example to workaround this with Angular2, see the blog entitled Cross-Origin Resource Sharing; or Why I Can't Use AJAX with Learn APIs.
Configure an Instance of Learn to Work with Your Application
Once you have registered with the developer portal and built an integration, deploying to a Learn SaaS instance is a simple step. The Learn administrator that wants to use your integration needs the Application ID you got from the developer portal. The administrator will also need to create a Learn user account with sufficient entitlements to associate with your integration. This gives the administrator full control over the entitlements used by your application. For more information on how to configure Learn, please see Managing REST Integrations in Learn: The REST Integrations Tool for System Administrators.
Glossary
| Term | Definition |
|---|---|
| Application ID | Unique identifier for the application used to integrate with the Learn REST Services. Each unique integration should have its own Application. |
| Application Key | Each application is assigned a unique key. This is used to authorize REST API calls against Learn. |
| Application Secret | Each application is assigned a unique secret. This is used to authorize REST API calls against Learn. |
| Access Token | A token is a unique string representing an implicit authorization granted by an OAuth 2.0 Service Provider. |
| CRUD | Create, Read, Update, Delete |
{: .striped}
More Information
We will continue to add new examples, tutorials, and code samples, so make sure to check these links regularly.
Contributors on this article: