LTI 1.3 Tool Implementation Guide
Published: Not Available
Last Update: Not Available
Overview
Implementing an LTI 1.3 + Advantage tool is involved, but we'll break down the steps here. There are many good resources for building an LTI 1.3 tool as well:
What is LTI?
At the end of the day all LTI is is a hyperlink from one web application (a Learning Management System or Virtual Learning Environment, called a Platform in the LTI specs) to another web application, called a Tool. The tool is normally hosted at a different domain and often created and supported by another vendor or the learning institution.
The difference with LTI from a regular hyperlink is it includes data such as the user making the request, the course context and possibly information about the resource (e.g., assignment, discussion, book chapter). For this reason an LTI message must be sent as an HTTP FORM POST to the receiving web application.
Security
Why is LTI complicated if all it is is a hyperlink with data? The answer is: security.
A tool cannot blindly receive an HTTP POST with data from just anywhere. It needs to know who is sending that data and that it can trust the sender. A security contract must be established between the learning institution hosting the LMS and the tool. Additionally, because all LTI traffic is being transfered via a web browser, that traffic needs to be secured, both from an encryption standpoint as well as from a request forgery standpoint.
Cross-site Request Forgery
When a browser-based application has links that a user can click on to make something happen, there is an inherent risk of a cross-site request forgery attack, often abbreviated as CSRF or XSRF. If you are logged into your bank account's web site and they have a link or a URL that allows you to transfer money from one account to another, you run the risk of a malicious party offering you a link via email or social media that could get you to transfer money from your account to accounts you don't intend to send money.
In the world of teaching and learning, with an LTI tool link, there exists the possibility that a malicious user could offer you a link via email or social media to get you to act on their behalf, such as take a quiz or buy a book. We'll soon see how the LTI specs prevent this sort of attack.
Encryption
Sensitive personal data are sent in LTI messages, so those data must be encrypted and LTI requires the use of TLS 1.2 or higher protocol from the browser. The days of insecure http transport are over. You must run your tool behind SSL supporting the TLS 1.2 or higher protocol.
Authentication
A tool needs to have a trust relationship with any LMS sending them an LTI message. They can't just accept a message from anyone. Messages must be signed by the sending party and that signature must be validated by the receiving party. The solution the IMS Global has adopted is to use OAuth 2, OpenID Connect, JSON Web Tokens (JWT), and asymmetric public/private key pairs. These are all industry standard specifications for security, and LTI builds upon those.
When a platform sends a message it packages it up as a JSON Web Token (JWT) and signs the token with its private key that it has minted and stores securely. The platform publishes its public key at a publicly-accessibly URL and the tool uses that public key to validate the signer of the message.
Registration Information
In order to achieve the security objectives, there are some pieces of information that must be exchanged between the platform and the tool. This is the security contract.
The platform must receive the following information from the tool:
- The fully-qualified domain name(s) where the tool is hosted, e.g., example.com
- The OIDC Login URI - a URL to the tool's endpoint for initiating the 3rd-party initiated login flow, which protects agains CSRF. See the OIDC 3rd-party intiated login specification.
- One or more Redirect URIs - a URL where the tool will receive the LTI FORM POST with the id_token (JWT) containing the LTI message payload. Note, the redirect URIs must use the fully-qualified domain names referenced above.
- JWKS URL - The URL for the tool's public key set. If the tool is going to send messages to the platform, such as a Deep Linking response or a request for an OAuth access token, then the tool must sign those messages with a private key that it has minted, and provide the public key associated with that private key. This is the asymmetric part mentioned above. See https://tools.ietf.org/id/draft-ietf-jose-json-web-key-00.html for more information.
- A signing algorithm, e.g., RS-256 or RS-512. Both sides need to agree on the algorithm to sign and verify messages.
The tool must receive and store for later use the following information from the platform:
- Issuer - the issuer of the credentials. In Learn's case it is always https://blackboard.com
- Client ID - in Learn this is labeled the Application ID. An issuer can have one or more client IDs associated with it.
- Public JWKS URL - the JWKS URL of the platform (Learn in this case) with which the tool validates the signature of incoming LTI messages
- OAuth 2 Token URL - the URL of the platform's OAuth 2 token issuer for use when making LTI service calls, such as for Assignment and Grades, or Names and Roles.
- OIDC Auth Request URL - the URL the tool must redirect back to after an OIDC login request. This is part of the OIDC login flow for protecting agains CSRF attacks
- Deployment ID - a single client ID can have one or more deployments, so tools must track each of those deployments. This is an extension created by the LTI specification.
With Learn you will also receive an Application Key and and Application Secret. Store these securely. These are what you use if you want to use the Learn public REST API.
LTI Message Launch Flow
We have covered the information the two parties need to exchange and why that information is needed, at a high level. Now we look at the specifics of implementing the reception of an LTI launch by a tool from a platform.
The UML sequence diagram below shows all the steps, including some optional ones, for implementing the reception of an LTI message launch. We'll break each step down in words.
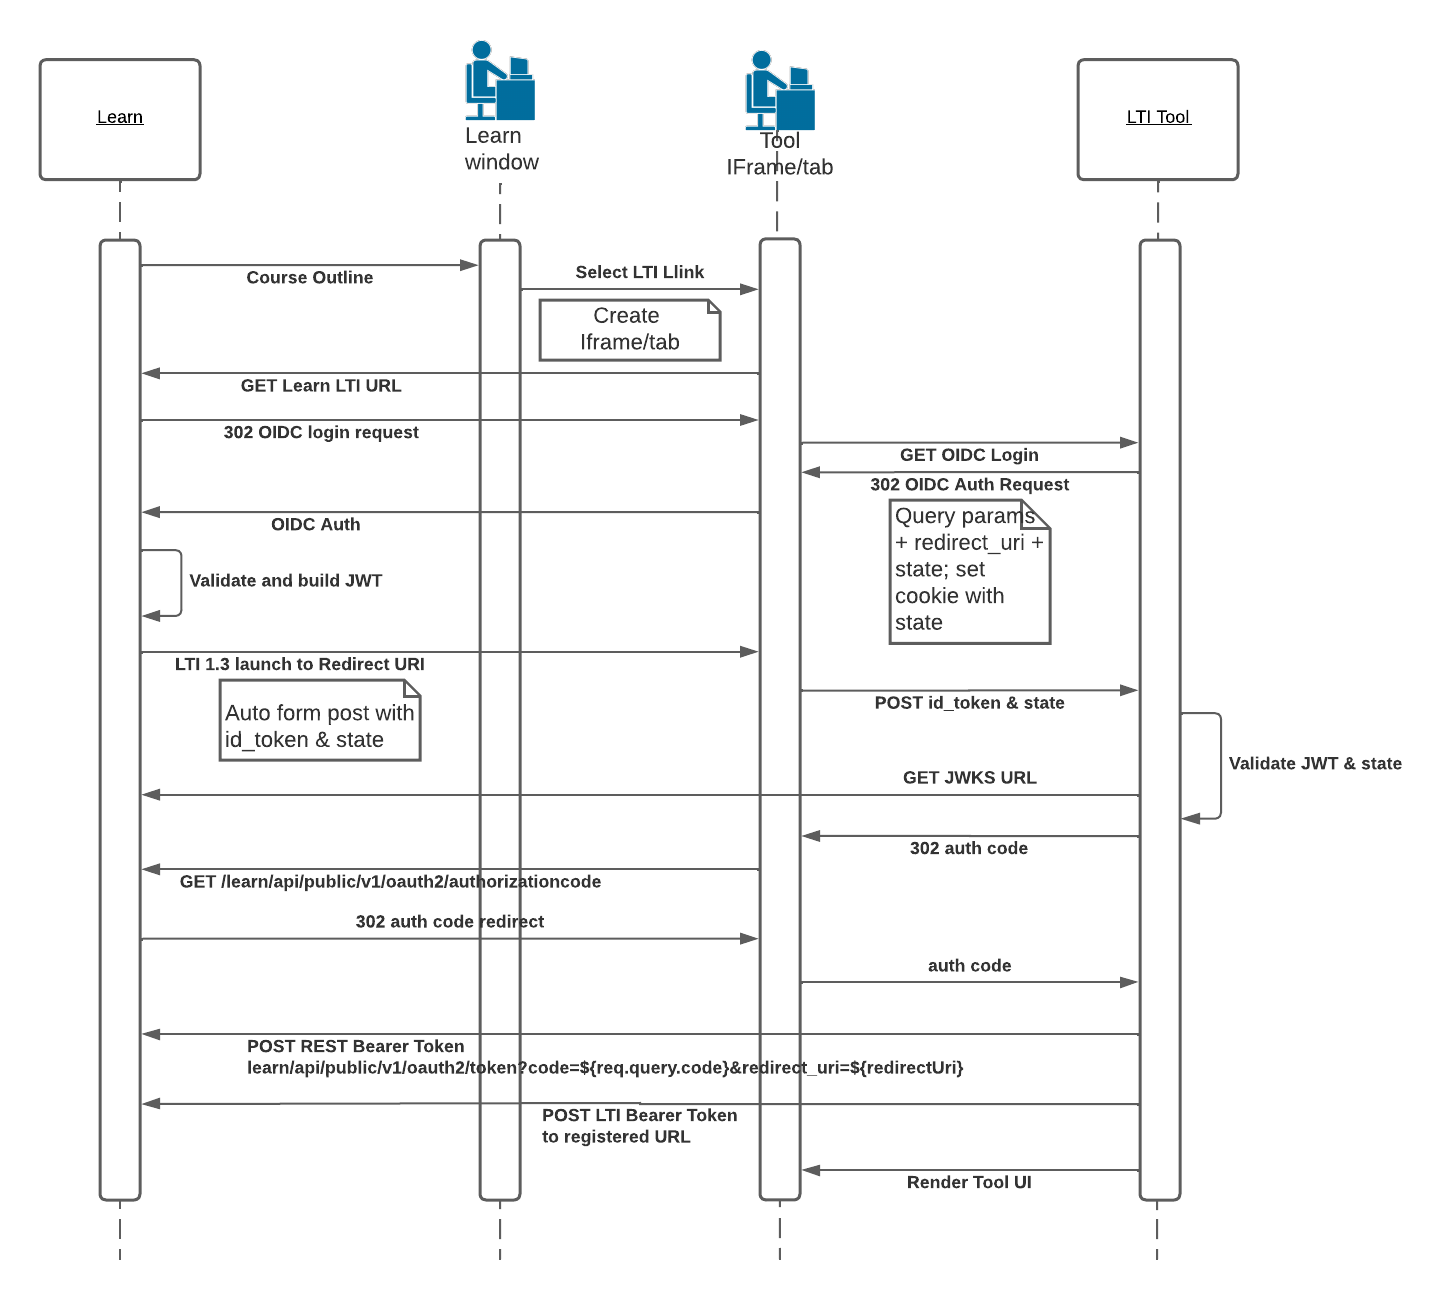
LTI Launch
OIDC Login
When a user clicks on an LTI link within Learn the Learn server receives a GET request from the browser with information about that LTI link. Once it loads the tool configuration associated with that link the first thing it does is initiate the OIDC Login request with a browser redirect to the registered OIDC Login URI provided by the tool. It passes some information along with the request as query parameters.
The data sent by the platform on the OIDC login are:
- issuer
- login_hint - an opaque value to the tool that must be returned back
- target_link_uri - the URI configured by the tool for this LTI link
- lti_message_hint - an opaque value to the tool that must be returned back
- lti_deployment_id - this is optional, but Learn always sends it
- client_id - this is optional, but Learn always sends it
- lti_storage_target - for use if cookies aren't possible
The tool must then redirect or post back to the registered OIDC Authentication Request URI provided by the platform, including a Redirect URI (which must be pre-registered) and a state value, along with the other values passed in by the platform. The Redirect URI declares where the tool wants the subsequent LTI launch to go, and the state is what protects against CSRF. The state should be saved in a cookie, so the tool can verify that the initiator of the request is the same browser that sends the LTI message launch. If a cookie cannot work because of browser restrictions preventing setting of cookies by 3rd parties in iframes, then another option must be pursued. There is a new spec coming soon to help with that.
The fields the tool must send back are:
- response_type=id_token
- scope=open_id
- login_hint - that was passed in on the login request
- lti_message_hint - that was passed in on the login request
- state - a value the tool generates for protecting against CSRF
- nonce - a value the tool generates to protect against duplicate requests
- redirect_uri - a pre-registered URL the tool wants the subsequent LTI POST to be made
- client_id - the client ID of this registration
Receive JWT
The platform receives the OIDC authentication request from the tool and validates that the redirect URI is registered. It then builds the id_token (JWT) that contains the LTI payload (user, course, resource, etc.) and signs it with its private key. The platform then auto-submits a FORM with the POST method to the redirect URI the tool specified with two form parameters:
- id_token - the JWT
- state - the state the tool passed to the platform in the OIDC login response
The tool receives this FORM POST from the browser and the first thing it should do is validate the state is what it stored in the cookie. If it doesn't match the tool should reject the request.
The next step is to unpack the JWT and validate the signature. JWTs are comprised of three Base64-encoded strings separated by the period (.) sign. The first part is the header which contains the key ID (kid) and signing algorithm. The second part is the payload in JSON format, and it contains the issuer (iss), client ID (aud), user ID (sub) and other information about the launch. The tool must look up the platform configuration for that issuer/client ID/deployment ID combination and get the platform's public key from the registered public key URL, using the kid in the JWT header for selecting the particular public key the platform requires. The third part is the signature, which normally the tool code won't work with directly.
The tool then uses a library of their choosing to validate the signature of the JWT. If the signature is valid then the tool can proceed to process the rest of the JWT information and render its UI with the information it has about the LTI message.
Optional Steps
There are two optional steps in the sequence diagram above.
Learn REST Token
If your tool is going to use the Learn public REST API in order to get or set information it can't via LTI then it should retrive a Learn OAuth 2 access token at this time and cache it. There are choices as to what OAuth 2 flow you can use, so please refer to this document on how to retrieve a Learn OAuth 2 access token. In the diagram above we show using the AuthCode flow as its the most common for UI-based work where you want the API call to be done on behalf of the interacting user. See this document on using three-legged oauth.
LTI Rest Token
If your tool wants to take advantage of the LTI services, such as Assignment & Grades, or Names & Roles, then you'll need to retrieve an LTI access token. This token is of a different format and uses a different security model than the Learn public API.
You'll need to construct a signed (with your private key) JWT and post that to the OAuth 2 Token URL registered with the tool. If all is well you will receive an access token back, which you should cache, and use for making service calls back to Learn. We'll cover making service calls in a later section.
LTI Deep Linking
LTI Deep Linking is a UI flow that allows a user, often an instructor, to launch from the platform to the tool, via the browser, and display a UI from the tool from which to select or create content that will end up back in the platform. For example, you may wish to include links to publisher content in the course outline. You may wish to embed an instructional video in the rich text editor of a discussion or assignment. You may wish to create an assignment via a plagiarism detection service and include that in a learning module. There are unlimited use cases for deep linking. The key point to understand is that it's about getting content from a 3rd party LTI provider into the Learning Management System of your choice. Rather than having an instructor copy and paste URLs the tool vendor provides, which is the old way of doing things, deep linking allows the instructor (or student, in the case of submitting an assignment or contributing to a discussion) to select content via the tool's browser-based UI.
An LTI Deep Linking launch is much like a Resource Link launch, except the message type is different, and you receive an additional claim: https://purl.imsglobal.org/spec/lti-dl/claim/deep_linking_settings
This claim contains information about what the platform accepts, and a data field that must be sent back.
The tool then presents a UI allowing the user to select or create content the tool provides. It can be LTI links, web links, files, images, or html. Learn only supports LTI links and web links at the moment.
You can return one or more content items, and depending on from where the tool was launched the links will appear in the course outline or the rich text editor. If returned to the rich text editor they can be displayed as hyperlinks or embedded in the editor. See Deep Linking JSON for details on how to configure the rendering of LTI links in the rich text editor.
Contributors on this article: