Blackboard AMI From VMDK
Published: November 19, 2014
Last Update: December 30, 2024
VMDK Availability
NOTE: If you are on this page and have not yet downloaded the .vmdk file from support.anthology.com please visit that site. Login if you have an account and look for the button on the page titled [New Way to Access Blackboard AMI] and click it. You could also use the search tool to find the article "New Way to Access Blackboard AMI." If you do not have an account, that's OK!! In that case you will be required to fill out a form with contact informaiton prior to your download. The rest of this document explains what the .vmdk file is and how you use it to create a Blackboard AMI in your AWS account.
Introduction and Prerequisites
We've developed a means to distribute the Blackboard AMI without the use of the Amazon Marketplace, or managed access to our AWS S3 buckets. To do so we now publish a .vmdk file on our support portal for the Blackboard build that you download and then convert to an AMI in your AWS account. The current .vmdk file, export-ami-98ffcb2475f78317t.vmdk, is for Blackboard Learn 3900.112. The license expires 2025-05-17. The previous .vmdk file (export-ami-c0d1840cdde882d7t.vmdk) was for Blackboard Learn 3900.110. It is provided for reference only and is no longer available for download. Its license expires on 2025-05-17.
This document explains how you take the .vmdk file you’ve downloaded and convert it into an AMI in your AWS account. The major prerequisite is that you will need to have your desktop/laptop configured to use the AWS Command Line Interface (CLI). Several steps only function using the CLI. Refer to https://aws.amazon.com/cli/ If you have any issues with the AWS CLI review the Amazon documentation and/or reach out to Amazon for support. Another prerequisite is a good, stable, internet connection. The file is large, close to 10GB, and can take an hour or so to upload @ 22MBPS.
You will need to download the .vmdk file from support.anthology.com before proceeding with the instructions in this document. If you've a support.anthology.com account login and then find the button on the home page titled [New Way to Access Blackboard AMI]. Click the button, on the page that comes up read and accept the terms, then at the bottom click the accept button. Your download will start. If you don't have a support.anthology.com account you can find the button and accept the terms, and you will have an additional step of filling out a form with your contact information. Once you've filled out the form your download will start. NOTE: THE DOWNLOAD CAN TAKE BETWEEN AN HOUR OR TWO. Have a good internet connection
Overview
An overview of the process that you will be doing, once you have the .vmdk file, is as follows. You will create an S3 bucket in your AWS account to which you will upload the .vmdk file. You will configure your AWS account policies so that you can use the CLI to convert the .vmdk file to a snapshot. You will create a configuration file on your desktop/laptop named containers.json that contains the JSON configuration for converting the .vmdk file in the S3 bucket into a Snapshot. You can then use the graphical dashboard to create an AMI associated with the Snapshot.
NOTE: We use learnexports as our S3 bucket name in the instructions that follow. S3 buckets must have a unique name across all of AWS. You will need to name your S3 bucket something unique and use that name where learnexports is used below. Read Amazon's documentation on naming requirements.
Steps to Convert the .vmdk File to an AMI
- Configure the AWS CLI for your AWS account. See https://aws.amazon.com/cli/ The CLI MUST be used for some steps. This is not optional.
- Test that you can use the CLI to view your S3 buckets from your terminal:
- aws s3 ls
- Expected result: you get a list of S3 buckets.
- Use the GUI or CLI to create an S3 bucket, with all of the settings as the default, in your AWS account named learnexports.
- REMEMBER Modify learnexports to your unique name. Example: learnexports-bigsoftinc.
- Upload the .vmdk file that will be used to create an AMI into the learnexports bucket. This will take some time, between an hour and a couple of hours depending on your network speed. You may continue here to configure your AWS account during the upload process.
- Once you have the equivalent of a learnexports bucket in S3, configure your AWS IAM as follows using the GUI:
- Select the IAM service to get the IAM > Dashboard
- Under Access management in the left nav, select policies
- Click [Create policy]
- On the Specify permissions page, click the [JSON] button.
- Using the JSON policy editor, input the following JSON. REMEMBER You will need to use the unique S3 bucket name you've chosen in place of learnexports.
{
   "Version": "2012-10-17",
   "Statement": [
      {
         "Effect": "Allow",
         "Action": [
            "s3:GetBucketLocation",
            "s3:GetObject",
            "s3:ListBucket",
            "s3:PutObject",
            "s3:GetBucketAcl"
         ],
         "Resource": [
"arn:aws:s3:::learnexports",
            "arn:aws:s3:::learnexports/*"
         ]
      },
      {
         "Effect": "Allow",
         "Action": [
            "ec2:ModifySnapshotAttribute",
            "ec2:CopySnapshot",
            "ec2:ImportSnapshot",
            "ec2:RegisterImage",
            "ec2:Describe*"
         ],
         "Resource": "*"
      }
   ]
}
- Hit [Next] then on the Review and create page set the Policy Name to avmimportpolicy. Click [Create policy] at the bottom of the page.
- Attach the policy to the AWS user you will be using for this work. To do this navigate to the IAM console, select the desired user, go to the "Permissions" tab, blick "Add permissions", then choose "Attach existing policies directly" and select the policy you want to attach to the user. See Amazon's documentation for more detail.
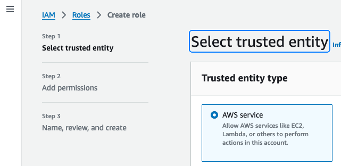
- In the IAM left nav, under “Access management” click “Roles”.
- Click [Create role] in the upper right of the page.
- Trusted entity type is AWS service. See screenshot below.

- In the Use case section, select the EC2 service. Click [Next].
- Now you are on the “Add permissions” page. Use the Search to find the avmimportpolicy you just created in steps 4 and 5. Check the box next to it. Then click [Next].
- Now you are on the “Name, review, and create” page.
- At the top, under Role details, YOU MUST NAME THE ROLE vmimport <- exactly this. Nothing else! Leave everything else as the default and scroll to the bottom of the page.
- Click [Create role] at the bottom right of the page.
- Now use the Search to find the vmimport role you just created. Click on its link.
- Click on the “Trust relationships” tab just to the right of “Permissions”
- Click the [Edit trust policy] button.
- Replace ALL of the JSON shown with the following JSON:
{
    "Version": "2012-10-17",
    "Statement": [
        {
            "Effect": "Allow",
            "Principal": {
                "Service": "ec2.amazonaws.com"
            },
            "Action": "sts:AssumeRole"
        },
        {
            "Effect": "Allow",
            "Principal": {
                "Service": "vmie.amazonaws.com"
            },
            "Action": "sts:AssumeRole",
            "Condition": {
                "StringEquals": {
                    "sts:Externalid": "vmimport"
                }
            }
        }
    ]
}
- At the bottom right of the page, click the [Update policy] button. You have finished configuring the necessary IAM policies and roles so you can convert a .vmdk file into a snapshot that can be used to create an AMI. Now proceed to do so.
- Create a containers.json file in a directory on your laptop/desktop computer. The file should contain the following JSON for the 3900.104 VMDK. You will replace the Description and the export-ami- lines with the current values for each release.
- REMEMBER learnexports will need to be the unique S3 bucket name you've chosen.
{
    "Description": "Learn3900104VMDK",
    "Format": "VMDK",
    "UserBucket": {
        "S3Bucket": "learnexports",
        "S3Key": "export-ami-0e0a6b40cd7b773ca.vmdk"
    }
}
- Use the CLI to convert the .vmdk into a Snapshot.
- aws ec2 import-snapshot --description "Learn3900100VM" --disk-container "file:///Users/mkauffman/work/bbami/3900.100.0/containers.json"
- See aws ec2 import-snapshot documentation. You need the full path to your containers.json file
- This will create a snapshot file for you.
- JSON output will include a line like: "ImportTaskId": "import-snap-084a4afb185bedc98" <- NOTE the taskId. You will use it in the next step.
- Use the CLI to monitor the conversion of the .vmdk to a snapshot.
- aws ec2 describe-import-snapshot-tasks --import-task-ids import-snap-084a4afb185bedc98
- Use the task Id you got from the prior step.
- Eventually,after a few minutes, you will get JSON output with “Status”: “completed” and, for example a “SnapshotId”: "snap-04465254a72c30c82"
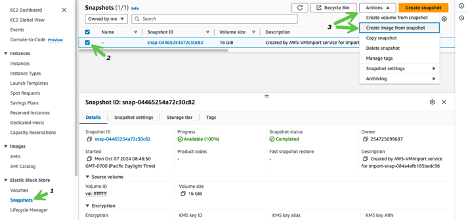
- Look in the EC2 section of your AWS GUI for the Snaphshots link. You will see the snapshot you just created. Check the box next to it, then under the Actions menu select “Create image from snapshot.” See the following screenshot.

- On the “Create image from snapshot” form give the image a meaningful Name, Ex: “3900.100 Blackboard REST AMI from Snap 04465254a72c30c82”, and a similar Description. Click the [Create image] button at the bottom of the page.
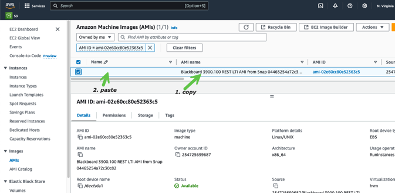
- You should see a message indicating that the AMI has been created. Under Images in the EC2 dashboard left navigation, click AMIs. You will find the AMI you just created from the snapshot. You can copy the AMI name to the Name field.

- You can now Use the Blackboard REST and LTI Developer AMI as per Use the Blackboard REST and LTI Developer AMI.
- NOTE: Make certain to have a security policy on your EC2 instance that allows HTTP and HTTPS traffic from anywhere. Let’s Encrypt will not function correctly without HTTP being open.