Receiving the id_token
Published: Not Available
Last Update: Not Available
From the initial workflow used in previous sections, we can now work on the next part of the flow, which is handling the POST request, including the id_token.
The flow
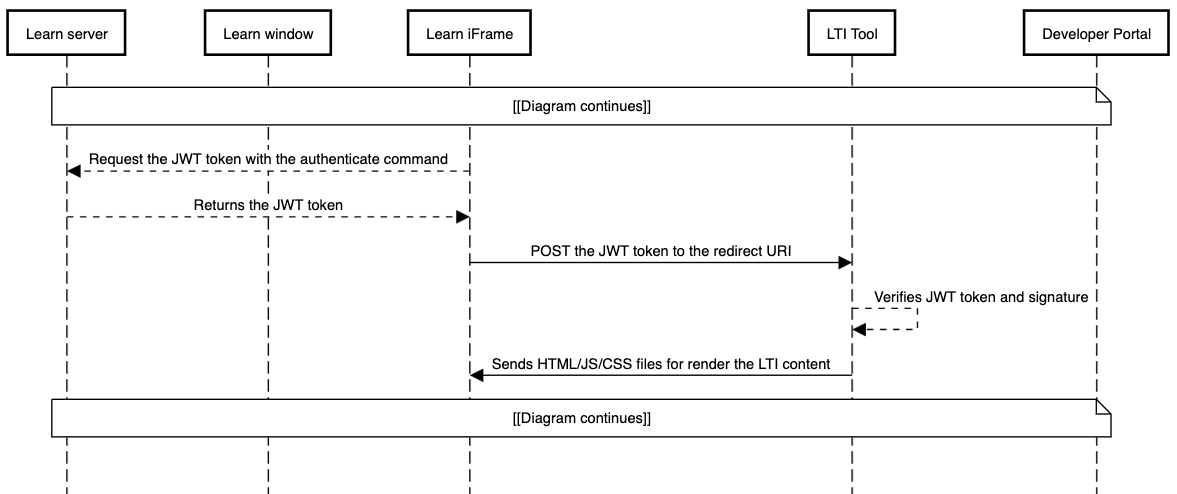
Continuing after the OIDC redirect from the last section, the Developer Portal receives the OIDC authentication request from the tool and validates that the redirect URI is registered. It then redirects to Learn with a command to authenticate the LTI launch, which builds the id_token (JWT) that contains the LTI payload (user, course, resource, etc.) and signs it with its private key. Learn then auto-submits a form with the POST method to the redirect URI specified with two form parameters:
id_token- This is the JSON Web Token (JWT) that contains all the launch information. See jwt.io for more information on JWTs. You can also use that site to inspect any JWTs you receive or create.state- If you send a state value back in the OIDC auth response, you will receive this as a URL parameter. You can (and should) use it to ensure the user who initiated the OIDC login is the same user issuing the launch.
When your tool receives this form POST from the browser, the first thing it should do is validate the state stored in the cookie. If it doesn't match, the tool should reject the request, since it could have been altered in flight.
The next step is to unpack the JWT and validate the signature. JWTs are comprised of three Base64-encoded strings separated by a period (.). The first part is the header, which contains the key ID (kid) and signing algorithm. The second part is the payload in JSON format, and it contains the issuer (iss), client ID (aud), user ID (sub) and other information about the launch. Your tool must look up the platform configuration for that issuer/client ID/deployment ID combination and get the platform's public key from the Developer Portal public keyset URL, using the kid in the JWT header for selecting the particular key the platform used to sign the token. The third part is the signature, which normally your code won't work with directly.
Your tool then uses a library of their choosing to validate the signature of the JWT. If the signature is valid, then the tool can proceed to process the rest of the JWT information and render its UI with the information it has about the LTI message.
Steps needed to validate the token
These are the steps you can follow upon receiving the id_token JWT. Keep in mind that this is not the only way to validate tokens, and any other process can be used:
- Verify the token
- Get the header, body, and signature from the JWT (these parts are separated by a period
.) - Verify the signing algorithm is what you expect. This can be found by parsing the header portion of the id_token
- Verify if the launch is for the proper Client ID (Application ID) by checking the
audproperty of the body portion. It should match the Client ID of your tool - Get the JWKS key used by Learn to sign the JWT token. This can be found by performing a GET request to the JWKS endpoint given by the Developer Portal when registering the application (field called "Public keyset URL"). From there, you can select the proper key by checking the
kidvalue included in the header of the JWT token against the values received from the Developer Portal - Validate the signature using a JWT library, using the id_token and the key selected from the Developer Portal using the
kidvalue
- Get the header, body, and signature from the JWT (these parts are separated by a period
- If the validation passes, parse the body into JSON. You now have all the information you need to handle the launch of your tool
To prevent any issues while verifying the token, use a JWT library that has a verify function or something similar, since this will cryptographically validate the token.
Sample code
Below, you can find a sample code that outlines how the validation of the id_token can be performed
- NodeJS/ExpressJS
const jwt = require("jsonwebtoken");
const jwk2pem = require("pem-jwk");

exports.handleIdToken = function (id_token) {
  let parts = id_token.split(".");

  let header = JSON.parse(Buffer.from(parts[0], "base64").toString());
  let body = JSON.parse(Buffer.from(parts[1], "base64").toString());

  // Verify launch is from correct party
  // aud could be an array or a single entry
  let clientId;
  if (jwtPayload.body.aud instanceof Array) {
    clientId = jwtPayload.body.aud[0];
  } else {
    clientId = jwtPayload.body.aud;
  }

  let publicKey = // Get public key from the configured JWKS URL using the kid in the header of the JWT
    jwt.verify(id_token, jwk2pem(publicKey));

  // All is good so run with the JWT body
};